I caught up with Jessica Rule of Escape Button Blog and Nathalie Basha of The Travel Muse—two women who have perfected their Instagram accounts from destinations around the world>—for 10 tips on taking incredible travel pics and sharing them on Instagram and beyond. Here's how they do it.
Picking the Right Backdrop
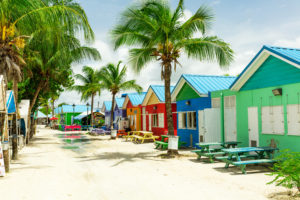
Yes, the subject of your photo is important. But so is the background. Here are Jessica Rule's and Nathalie Basha's favorite photo backdrops.
JR: "My favorite backdrop for travel photos is anywhere that makes us human beings pale in comparison. A looming cliff, raging waterfall or towering ruins remind me of how small we are in the world and how powerful Mother Nature is. These locations naturally do most of the talking in a photo and inspire me to capture them in new ways."
NB: "Beaches! Or a really beautiful city, like Paris. I can't get enough of that architecture!"
RELATED: Why You Should Rent a Camera for Your Next Trip
Choosing the Best Filter
Picking a filter can make or break your photo—find out which ones Jessica and Nathalie use (or don't use).
JR: "The three filters I alternate between are Lark, Juno, and Ludwig. I lean towards them because they keep the look quite clean and don’t affect the color temperature of the photo too much. What they add to my photos is a bit of contrast and brightness, which brings more clarity to the image. Each of these filters affects the earth tones, blues and greens in a different way so I go with the one that compliments my subject the most. For example, if I’m photographing the ocean I’ll choose the one of these three filters that makes the water pop the most."
NB: "I actually don't use the filters (can I say that out loud? ;)) Instead, I edit the picture and up the brightness. Just a touch ... it has a really beautiful effect on landscapes."
Finding the Right Lighting
I asked both Jessica and Nathalie what their number one tip is and both said lighting>—here's why.
JR: "Take advantage of good natural light. I don’t shoot anything at night because I don’t like the way that a camera flash washes out the image. When I unexpectedly find myself in good lighting conditions, like sunlight flooding through a window, I take the opportunity to shoot an outfit, accessories or decor because I know the natural light will make even the simplest shot aesthetically pleasing. If you have a particular subject or location in mind, visit it in the early morning or late afternoon to take advantage of softer shadows and colorful skies."
NB: "Sure, you can tweak all that in the app but it's always best to get it right at the source. Well-lit pictures are just more eye-catching than dark ones."
RELATED: One Simple Tip for Taking the Best Travel Photos Every
The Best Photo Editing App
Editing a photo is an often overlooked step, but crucial if you want to make your photo stand out. Find out which app Jessica loves.
JR: "Enlight used to be my favorite because of the huge range of adjustments you can make and the ability to ‘selectively adjust’ only part of the image. I did find that I was over-editing my photos though, causing a lot of inconsistencies in the look. Now I only use VSCO for iPhone because its filters and editing tools are a little more definitive. This forces me to stick to a particular style and also to take better shots to begin with so that I don’t have to tweak too much in the app."
RELATED: 10 Ways to Take Better Travel Photos on Your Phone
Choosing the Orientation
Setting up the shot and choosing the proper orientation is a crucial step. Both Jessica and Nathalie have their opinions on this one.
JR: "This one I change up quite a bit depending on the subject. I definitely prefer horizontal photos for landscape shots so that you can take in as much of the scene as possible. I tend to use vertical or portrait photos for outfits and places where I want to put emphasis on long lines. For example, a pretty door or narrow laneway lends itself well to portrait orientation because it shows the full height."
NB: "Horizontal! For sure. It's the closest to how we see the world with our own eyes."
RELATED: The 3-Minute Tutorial to Amazing Vacation Photos
How to Pose
Here's how Jessica and Nathalie avoid looking awkward in their photos.
JR: "I am the first to admit that I’m quite terrible at posing. I manage to look very unnatural and awkward when trying to pull off a specific look. I’ve learned to go with whatever mood I’m in and what I would naturally do with my body language. For travel photography, it pays to stand back and look at the scene you want to be photographed in. What are you trying to convey in the shot? Is it a sense of happiness, freedom or sheer amazement? This will dictate whether you look at the camera, smile or have your back to the camera entirely. "My favorite pose is to move within a spot I would naturally find myself in and let the landscape do the talking. If there is an impressive monument in front of me I don’t want to draw attention away from it by posing awkwardly."
NB: "Smile at the camera, face ever so slightly turned to the right. But honestly, I like candids a lot. It's hard to get them because your camera person has to be pretty on it, and you truly can't know it's being taken otherwise the audience can smell the inauthenticity. But when you get a beautiful candid, they're the best pictures."
How to Get the Best Group Shot
And here's how both Jessica and Nathalie get awesome group shots.
JR: "Group shots are notoriously tricky and I am ALWAYS the one who blinks in every photo. The first thing I would recommend is not asking more than one person to take a photo of your group. When you have multiple iPhones or cameras pointed your way, people are inevitably going to look at the wrong one. Instead, pick the best camera out of your group and ask someone to take a few shots from one or two angles. That way they’re likely to snap a bit of banter between your group which is always more endearing than saying 'cheese.'"
NB: "Make sure everyone is in frame! Good lighting, again. And in this case, candids really are the BEST. It's so fun to see a group of people in an unguarded moment, laughing or talking."
How to Get the Best Solo Shot
Find out what tips and tricks they use for solo shots.
JR: "A big shout-out to solo travelers who manage to take amazing photos of themselves! This is quite a skill and something that I haven’t had to do too much of. If you don’t want your travel album made up of lots of selfies, you will have to plan a shot with yourself in it and use a remote trigger or passerby to take the shot for you. If you don’t have a trigger, you can set the timer function on your camera to give you time to move into frame. A tripod is a must here since you won't be manning the camera. If you don’t want to add to your suitcase weight, I highly recommend purchasing a Gorillapod. These are small, lightweight tripods that can grip on to just about any horizontal surface to hold your camera in place. "If you’d rather enlist a fellow tourist to take the shot for you, look for someone with an SLR or expensive looking kit, they will most likely have a good understanding of exposure and shot composition. It doesn’t hurt to mention what kind of shot you would like too, as everyone’s preferences are different. Wide, close up or 'more of the view' are all quick cues that will help them out."
NB: "Framing a solo shot can do a lot to elevate an image. If a person is looking off into the distance to their right, for example, frame the person off-center so the audience can see what the person is looking at. Generally, I try never to have my or any solo image framed exactly in the center ... it just creates a more dynamic image to offset the subject."
To Selfie or Not to Selfie ...
Ah, the great debate. Here's Jessica and Nathalie's take on selfies.
JR: "I’m quite anti-selfie when traveling, which seems to be an unpopular opinion these days. There are situations where it totally makes sense. Say you want to document an amazing personal moment and you only have a camera phone on you. By all means, it’s better to have captured that moment and savor it later than to miss it entirely. I love seeing my friends' travel selfies with their partners, and it’s their smiling faces that make those shots so great. When you are photographing a landscape or monument however, I think a selfie in front of it only detracts from the location. I remember walking through the Palace of Versailles next to a girl who took an iPhone selfie in front of every statue. There’s no way she could have had anything more than the statues’ feet behind her head and I wondered what she would get out of it after returning home. "Selfie sticks have improved the ability to get a wider shot, which I can see has its benefits. I guess it’s all down to why you are documenting your travels in the first place. My sister often complains that I don’t take enough photos of myself at tourist attractions, so if you have friends and family eagerly awaiting Facebook updates, selfie away! Personally, I take a lot of travel photos for the purpose of collating design inspiration so I don’t want to capture the top of my head in the shot!"
NB: "I try not to do selfies. Gratuitous selfies, no. Sitting in the car, taking pictures of your face, doesn't tell much of a story. But if it's a selfie of you DOING something, great. Selfie while you ride horseback, drink a latte in a cool city ... that kind of thing."
RELATED: What Not to Do When Taking a Selfie
Using the Right Accessories
Find out what extra accessories Jessica uses to perfect her iPhone shots.
JR: "I purchased an iPhone macro lens attachment about two years ago. This was because I often wanted to capture tiny details that were too close for the iPhone camera to focus on. More recently, I have steered away from iPhone photography completely. I found that if I didn’t take my SLR out for the day, I was always comparing my iPhone’s effort to what could have been. Now I’ve come to terms with carrying a heavier camera around for the sake of honing my photography skills. If you are limited to mobile photography, I would invest in a small tripod or Gorillapod to minimize shake and blur, a spare external battery for busy days of shooting, and a lens kit to facilitate fisheye and macro shots."
What are your best photo tips? Share them with other readers below.
More from SmarterTravel.com
- 10 Stylish Camera Bags You'll Actually Want to Use
- 11 Travel Photos You Should Stop Taking Right Now
- How to Turn Your Smartphone into a Pro Camera
Read the original story: How to Take Envy-Worthy Travel Photos by Ashley Rossi, who is a regular contributor to SmarterTravel.